2016年7月24日日曜日

LSTMによる正弦波の予測 〜 Chainerによる実装 〜


はじめに


 「RNNにsin波を学習させて予測してみた」ではTensorflowを使って、「深層学習ライブラリKerasでRNNを使ってsin波予測」ではKerasを使って、RNNによる正弦波の学習・予測が行われている。ここでは同じことをChainerを使って実装する。

ネットワークの構造


 実装は以下の通りである。

-- lstm.py -- コンストラクタの引数の意味は以下の通り。

引数名 意味 デフォルト値
in_units 入力層のユニット数 1
hidden_units 隠れ層のユニット数 2
out_units 出力層のユニット数 1

隠れ層の各ユニットはLSTM(Long Short Term Memory)、損失関数は2乗平均誤差である。in_unitsout_unitsは1に固定し(実数値を1つ受け取り実数値を1つ返す)、hidden_unitsの値を変えた時の精度の変化を見る(後述)。

訓練データの作成


 実装は以下の通りである。

-- make_data.py -- コンストラクタの引数の意味は以下の通り。

引数名 意味
steps_per_cycle 正弦波1周期の分割数
number_of_cycles 生成する周期の数

steps_per_cycleを50に、number_of_cyclesを100としてデータを作成した。関数makeは全データを1次元の配列(np.ndarray)に入れて返す。関数make_mini_batchは、長さlength_of_sequenceのデータをバッチサイズ分(mini_batch_size)だけ切り出す。

訓練


 実装は以下の通りである。

-- train.py -- プログラム冒頭の定数の意味は以下の通り。

引数名 意味
IN_UNITS 入力層のユニット数
HIDDEN_UNITS 隠れ層のユニット数
OUT_UNITS 出力層のユニット数
TRAINING_EPOCHS 訓練時のエポック数
DISPLAY_EPOCH ログを出力するタイミング
MINI_BATCH_SIZE ミニバッチの数
LENGTH_OF_SEQUENCE 学習する実数値のシーケンスの長さ
STEPS_PER_CYCLE 正弦波1周期の分割数
NUMBER_OF_CYCLES 周期の数

関数compute_lossでは、長さLENGTH_OF_SEQUENCEの配列をMINI_BATCH_SIZE個一括して処理を行っている(下図参照)。
また、LENGTH_OF_SEQUENCE$\times$MINI_BATCH_SIZE個のデータの塊を1epochと定義した。以下を実行する。 DISPLAY_EPOCH(上の場合は10)epoch ごとに訓練時の損失値が表示される。上記のパラメータのとき計算時間は27分ほどであった。

学習曲線


 下図はHIDDEN_UNITSの値を2,3,4,5に変えた時の学習曲線である。縦軸は損失(2乗平均誤差)の対数($\log_{10}$)を取った値である。10epoch毎に1回ずつ表示していので横軸の値を10倍したものが実際のepoch数である。
隠れ層のユニット数を増やすと損失は小さくなるが、3以上になるとそれほど差はないことが分る。

予測


 予測時のスクリプトは以下の通りである。

-- predict.py -- 上記のスクリプトでしていることを以下に図示する。
ここで、input_seqは最初に与える波形、pre_lengthはその波形をもとに予測する波形の長さを表す。例えば、input_seqの長さを4、pre_lengthを3とすると予測手順は以下のようになる。
  1. 4つの実数値の並びから最後の値を予測する(これを4とする)。
  2. 最初の値を捨てて4を最後尾に追加し、これを使って最後の値を予測する(これを5とする)。
  3. 最初の値を捨てて5を最後尾に追加し、これを使って最後の値を予測する(これを6とする)。
  4. (4,5,6)が求める予測値である。
input_seqの長さを50として、pre_lengthを50とした時の結果を以下に示す。
input_seqの長さを25として、pre_lengthを75とした時の結果を以下に示す。
隠れ層のユニットの数が多いほど精度は良い。しかし、いずれのユニット数の場合も、最初に与える波形から遠ざかるにつれて精度は悪くなる。

2016年7月18日月曜日

Fully Convolutional Networks 〜 Chainerによる実装 再考2 〜


はじめに


 先のページで、fcn32sを Chainer を使って実装した。今回は、fcn32sの訓練済みモデルを使って、fcn16sの学習を行う。

学習曲線


 最初に学習曲線を示す。

Accuracy
Loss
今回はEpoch60回で打ち切った(かろうじて収束していないように見えるが課金量の関係である)。テスト画像の正解率は94%程度となり前回の92%より向上した。このあとfcn8sを行うことになる。

計算機環境


 前回と同じく、Amazon EC2 にある g2.2xlarge を利用した。GPU を搭載したインスタンスである。今回もミニバッチ処理ができないので1枚ずつ学習する。

データセット


 訓練画像、テスト画像ともに前回と全く同じである。

ネットワークの構造


 ネットワークの構造は以下の通りである。
前回と同じである。上記の表では224$\times$224の正方形画像を想定してその1辺の長さだけをinputに記してあるが、縦横の長さは任意で構わない。表の各項目の意味は以下の通りである。
  1. name: 層の名前
  2. input: 入力featureマップの1辺のサイズ
  3. in_channels: 入力featureマップ数
  4. out_channels: 出力featureマップ数
  5. ksize: カーネルのサイズ
  6. stride: ストライドのサイズ
  7. pad: paddingのサイズ
  8. output: 出力featureマップの1辺のサイズ
今回はfcn16sを実装するのでpool4、pool5 の出力に接続する層(score-pool4、score-pool5)が必要である。これを通ったあとの出力データ名をそれぞれp4、p5とする。p4とp5のfeatureマップの数はクラスの数に等しくなる。
この表も、正方形画像を想定してその1辺の長さをinputに記してあるが縦横任意で構わない。出力p5はbilinear補間で2倍され、p4に加算される。そのあと、元画像と同じサイズに拡大され、ラベル画像と比較される。


ネットワークの実装


 上記の構造をそのままChainerで記述する。

-- myfcn_16s_with_any_size.py -- 物体の境界線には-1を配置し、softmax_cross_entropyの計算時に境界の寄与を無視するようにした。また、関数F.accuracyの引数 ignore_labelを使えば境界線上の画素を除いてaccuracyを計算することができる。112行目から113行目にかけて記述した関数でp5を2倍に拡大し、116行目でp4に加算している。122行目から123行目にかけて記述した関数で加算結果を16倍し、126行目でラベル画像との間のクロスエントロピーを計算している。

訓練


 訓練時のスクリプトは以下の通りである。

-- train_16s.py -- 関数 copy_model は前回と同じである。 train_16s.pyでしていることは、
  1. オブジェクトmini_batch_loader_with_any_sizeを作る。
  2. fcn32sで学習したモデルを読み込む。
  3. MyFcn16sWithAnySize.pyで定義されたネットワークのオブジェクトを作る。
  4. 学習済みモデルのパラメータをこれにコピーする。
  5. 最適化アルゴリズムとして MomentumSGD を選択する。
  6. あとは、通常の訓練過程である。
mini_batch_loader_with_any_size.pyは前回と同じである。

結果画像


 以下にテスト画像に適用した結果を示す。左の列はfcn32sの結果、中央の列はfcn16sの結果、右の列はGround Truthである。下に記した数値はaccuracyである。ここでaccuracyとは、1枚の画像の中で何%の画素が正解したかを計算したものである(境界線上の画素は除く)。

一番最後の画像以外は、精度は向上している。

ダウンロード


 ここの、タグが2016-07-17のものです。

2016年7月16日土曜日

Fully Convolutional Networks by Chainer 〜 revisit 1 〜

in Japanese

Introduction


 In the previous post, a simplified Fully Convolutional Network (FCN) was implemented by means of Chainer. Its accuracy is lower than that of the original FCN. In this post, I have remarkably improved the accuracy by the following modifications:
  1. The original implementation of the FCN is written with Caffe. Caffe supports a "CropLayer" which the original code uses. Unfortunately Chainer does not support layers corresponding to the "CropLayer." I have noticed, however, that the similar outcome is achieved by utilizing an argument "outsize" which is passed to a function "chainer.functions.deconvolution_2d." The use of the function allows my code to accept inputs of any size. In the previous post, an input was made square with 224$\times$224 in advance.
  2. In the previous post, I didn't understand the fact that an image with information on labels in VOC dataset is not RGB mode, but index one. Therefore, I spent time to implement a function by which RGB is converted to an integer value. In this post, an index image is read using index mode directly.
  3. The procedures of the construction of the original FCN is fcn32s $\rightarrow$ fcn16s $\rightarrow$ fcn8s. The accuracy of the FCN depends mostly on that of the fcn32s, and the contributions from the fcn16s and the fcn8s are at most 1%. Though I showed the implementation of the fcn8s in the previous post, in this post the code of the fcn32s is demonstrated.
  4. As a mini batch learning was employed in the previous post, "chainer.links.BatchNormalization" was able to be introduced. In this post, there is no room to introduce the normalization because of the use of a one-by-one learning.
  5. In the previous post, weights in deconvolutional layers were learned using "chainer.links.Deconvolution2D." In this post, the deconvolutional layers are fixed to the simple bilinear interpolation.

Learning Curve


 The resultant learning curves are as follows:

Accuracy
Loss
Both curves have the ideal behaviour. The accuracy for test images achieves about 92%, which is much better than the previous accuracy. (If the trained model of fcn32s is succeeded by fcn16s and fcn8s, the accuracy will be about 93%.) More detail is provided below.

Computation Environment


 The same instance as the previous post, g2.2xlarge in the Amazon EC2, is used. As input images have various sizes, there is no choice but to run the one-by-one learning. The mini batch learning is not able to be used. It takes 3.5 days for the above learning curves to converge.

Dataset


 Just as before, the FCN is trained on a dataset VOC2012 which includes ground truth segmentations. The number of images is 2913. I divided them by the split ratio 4:1. The former set of images corresponds to a training dataset, and the latter a testing one.

number of train number of test
2330 583

As described above, all images are not resized in advance. The number of the categories is 20+1(background).

label category
0 background
1 aeroplane
2 bicycle
3 bird
4 boat
5 bottle
6 bus
7 car
8 cat
9 chair
10 cow
11 diningtable
12 dog
13 horse
14 motorbike
15 person
16 potted plant
17 sheep
18 sofa
19 train
20 tv/monitor


Network Structure


 The detailed structure of a network is as follows:
In the original FCN, there are some layers that follow the layer pool5. For simplicity, these layers are again removed. Under the assumption that an image is a square with 224 $\times$ 224, one side length of an image is written to a column "input" of the table shown above. It should be noticed that the FCN implemented in this post is actually permitted to accept inputs of any size. Each column of the table indicates:
  1. name: a layer name
  2. input: a size of an input feature map
  3. in_channels: the number of input feature maps
  4. out_channels: the number of output feature maps
  5. ksize: a kernel size
  6. stride: a stride size
  7. pad: a padding size
  8. output: a size of an output feature map
Because the fcn32s is implemented, only score-pool5 following pool5 is required. I refer to an output of score-pool5 as p5. The number of feature maps of p5 is equal to that of categories (21).
Though a column "input" of that figure also shows one side length of an image under the same assumption as shown above, inputs of any size are permitted. After upsampling p5 back to input size, it is compared with a label image.


Implementation of Network


 The network can be written in Chainer like this:

-- myfcn_32s_with_any_size.py -- By assigning a label of -1 to pixels on the borderline between objects, we can ignore contribution from those pixels when calculating softmax_cross_entropy (see the Chainer's specification for details). Using an argument "ignore_label" passed to a function "F.accuracy" allows us to calculate the accuracy without contribution from pixels on the borderlines. The function "F.deconvolution_2d" shown from the 99th line to the 100th line upsamples p5 back to the input size.

Training


 The script for training is as follows:

-- train_32s_with_any_size.py -- I used copy_model and VGGNet.py described in the previous post. The procedures shown in the script train_32s_with_any_size.py are as follows:
  1. make an instance of the type MiniBatchLoaderWithAnySize
  2. make an instance of the type VGGNet
  3. make an instance of the type MyFcn32sWithAnySize
  4. copy parameters of the instance of VGGNet to those of that of MyFcn32sWithAnySize
  5. select MomentumSGD as an optimization algorithm
  6. run a loop to train the net
The script mini_batch_loader_with_any_size.py is written like this:

-- mini_batch_loader_with_any_size.py --
The function load_voc_label shown from the 91th line to the 96th line loads a label image using the index mode and replaces 255 with -1. To load all the training data on the GPU memory at a time causes the error "cudaErrorMemoryAllocation: out of memory" to occur. Therefore, only one pair of an image and a label is loaded every time a training procedure requires it.
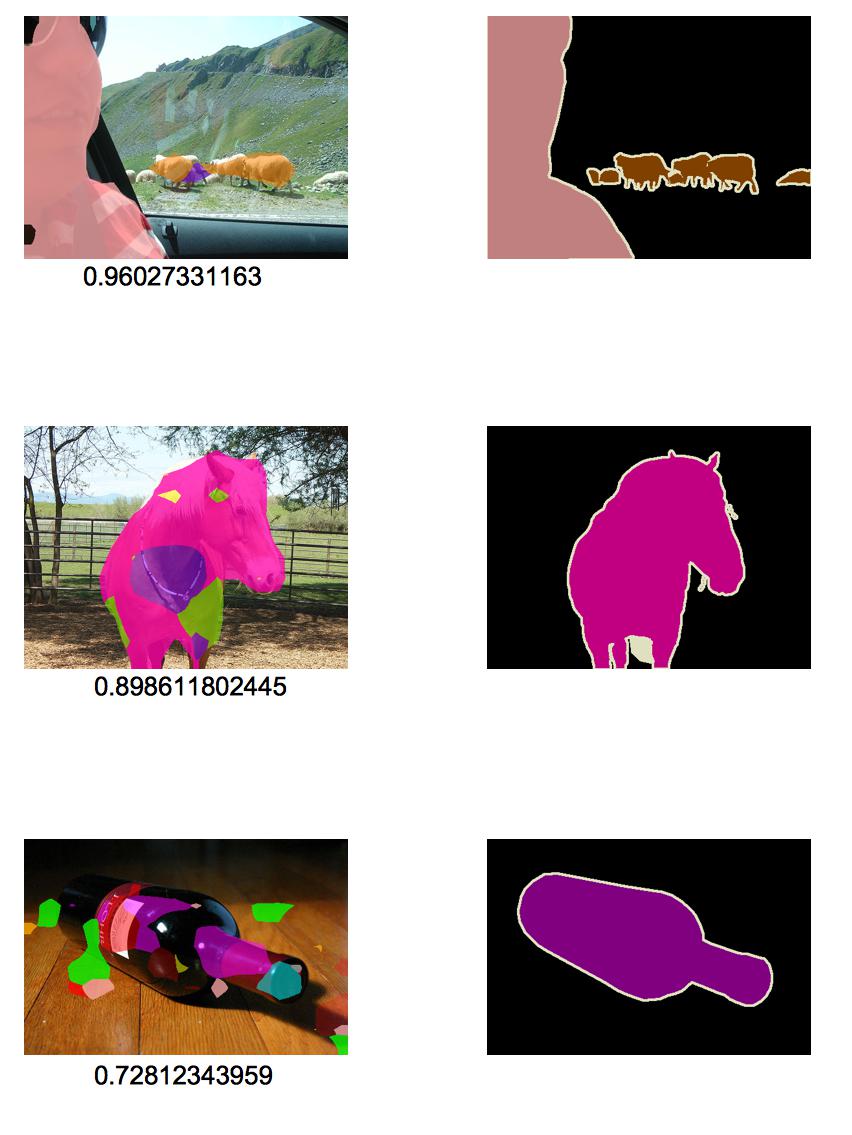
Prediction Results


 The left column shows prediction images overlaid on testing images. A value under each image indicates an accuracy which is defined as the percentage of the pixels which have labels classified correctly that are not on the borderlines between objects. The right column shows the ground truths.

I think that if fcn16s and fcn8s follow fcn32s, outlines of the objects will be much finer.

Download


 You can download tag 2016-07-09

2016年7月11日月曜日

Fully Convolutional Networks 〜 Chainerによる実装 再考1 〜

in English

はじめに


 先のページで、簡易化したFully Convolutional Networks(FCN)を Chainer を使って実装した。残念ながら、その精度は文献のものより低かった。今回以下の改良を行ったところ、格段に精度は向上した。
  1. FCNのソースはCaffeである。CaffeにはCropLayerなる層が実装されており、FCNはこれを利用している。Chainerにはこれに相当するものがないが、chainer.functions.deconvolution_2dのoutsizeという引数を利用すれば同じような効果が得られることが分った。この関数の利用により、任意サイズの画像を受け付けることができるようになった。従って、入力画像に対しては何も手を加えていない。前回は$224\times 224$にリサイズしたのであった。
  2. ラベルの情報を持つ画像(ラベル画像)はRGB画像でなく、インデックス画像である。前回はこれを理解しておらず、わざわざRGBから整数値に変換する関数を介在させていた。今回はインデックス画像としてラベル画像を読み込むようにした。
  3. FCNの正式な構築手順は、fcn32s $\rightarrow$ fcn16s $\rightarrow$ fcn8sである。FCNの精度は、ほぼfcn32sの精度で決まっており、fcn16s/fcn8sからの寄与は1%程度である。前回はfcn8sを実装したが、今回はfcn32sの実装を示す。
  4. 前回はミニバッチ処理を行ったので関数chainer.links.BatchNormalizationを導入したが、今回は1枚ずつ処理するのでこの層を削除した。
  5. 前回はchainer.links.Deconvolution2Dを利用して拡大時のパラメータも学習していた。今回はchainer.functions.deconvolution_2dを利用し、単純なbilinear補間による拡大を採用した。

学習曲線


 最初に学習曲線を示す。

Accuracy
Loss
どちらも理想的な曲線となった。またテスト画像の正解率は92%弱となり前回よりも格段に向上した。このあとfcn16s/fcn8sを行えば93%程度にはなりそうである。以下詳細を記す。

計算機環境


 前回と同じく、Amazon EC2 にある g2.2xlarge を利用した。GPU を搭載したインスタンスである。 ただし、今回はミニバッチ処理ができないので1枚ずつ学習する。上の結果を得るのに3.5日ほどかかっている。課金量も相当である。

データセット


 前回と同じく、データセットは VOC2012 である。領域分割の教師データの数は2913枚、これを4:1に分割し、前者を訓練データ、後者をテストデータとした。

number of train number of test
2330 583

前回は、訓練データ数は10で、テストデータ数は5で割り切れるように端数を切り捨てたが、今回はミニバッチ処理を行わないので、そのような操作はしていない。上述したように画像のサイズもそのままである。 カテゴリ数は前回と同じく20+1(背景)である。

label category
0 background
1 aeroplane
2 bicycle
3 bird
4 boat
5 bottle
6 bus
7 car
8 cat
9 chair
10 cow
11 diningtable
12 dog
13 horse
14 motorbike
15 person
16 potted plant
17 sheep
18 sofa
19 train
20 tv/monitor

ネットワークの構造


 ネットワークの構造は以下の通りである。
これは前回と同じである。文献では、pool5 の後ろにfc6とfc7があるが、これらを入れると拡大時の処理が煩雑となる(というかよく分らない)ので、これら2層は残念ながら今回も削除した。上記の表では224$\times$224の正方形画像を想定してその1辺の長さだけをinputに記してあるが、縦横の長さは任意で構わない。表の各項目の意味は以下の通りである。
  1. name: 層の名前
  2. input: 入力featureマップの1辺のサイズ
  3. in_channels: 入力featureマップ数
  4. out_channels: 出力featureマップ数
  5. ksize: カーネルのサイズ
  6. stride: ストライドのサイズ
  7. pad: paddingのサイズ
  8. output: 出力featureマップの1辺のサイズ
今回はfcn32sを実装するのでpool5 の出力に接続する層(score-pool5)だけが必要である。これを通ったあとの出力データ名をp5とする。このデータのfeatureマップの数はクラスの数に等しくなる。
この表も、正方形画像を想定してその1辺の長さをinputに記してあるが縦横任意で構わない。出力p5はbilinear補間で元画像と同じサイズに拡大され、ラベル画像と比較される。


ネットワークの実装


 上記の構造をそのままChainerで記述する。

-- myfcn_32s_with_any_size.py -- 物体の境界線には-1を配置し、softmax_cross_entropyの計算時に境界の寄与を無視するようにした(Chainerの仕様ではラベルが-1の画素は評価されない)。また、関数F.accuracyの引数 ignore_labelを使えば境界線上の画素を除いてaccuracyを計算することができる(前回はわざわざ実装していた)。99行目から100行目にかけて記載した関数F.deconvolution_2dでp5を32倍している。さらに、引数outsizeにtのサイズを渡すことで結果がtと同じになるようにリサイズを行う。引数padには辻褄合わせのpadding量を渡している。

訓練


 訓練時のスクリプトは以下の通りである。

-- train_32s_with_any_size.py -- 関数 copy_model とVGGNet.pyは前回と同じである。 train_32s_with_any_size.pyでしていることは、
  1. オブジェクトmini_batch_loader_with_any_sizeを作る。
  2. VGGNet.pyで定義されたネットワークのオブジェクトを作る。
  3. MyFcn32sWithAnySize.pyで定義されたネットワークのオブジェクトを作る。
  4. VGGNetのパラメータをこれにコピーする。
  5. 最適化アルゴリズムとして MomentumSGD を選択する。
  6. あとは、通常の訓練過程である。
mini_batch_loader_with_any_size.pyの内容は以下の通りである。

-- mini_batch_loader_with_any_size.py --
91行目から96行目までの関数load_voc_labelでは、pngのインデックス画像をインデックスのまま読み込み、値が255の画素を-1に置き換えている。データを一括読み込みすると、ビデオメモリーが足りなくなるので、要求されるごとに読み込むようにしてある。

結果画像


 以下の左の列に、テスト画像に対する予測結果をテスト画像にオーバレイした画像を示す。下に記した数値はaccuracyである。ここでaccuracyとは、1枚の画像の中で何%の画素が正解したかを計算したものである(境界線上の画素は除く)。右側の列は、Ground Truthである。

このあと、fcn16s/fcn8sを行えば、物体の輪郭はもう少し正確になるだろう。

ダウンロード


 ここの、タグが2016-07-09のものです。今となっては不要なファイルがたくさん残っています。